Wednesday, August 31, 2016

Sew-Along #33 - Sailboat Outfit - Lesson #3

The Sailboat Outfit by Oliver+S

** If you would like to see an image on our blog in a larger format, just click on it to enlarge.

Note: Links to products within this post are either links to our website or affiliate links.

You can find the Oliver + S Sailboat pattern in the shop. Kits are available as well. Click on the links below:

Welcome to Day 3


Before we begin with today's lesson be sure to read all of the patterns instructions. Today, and throughout the entire sew along, you will need your pattern in hand to go along with each lesson. Some things I will share/teach will not be in the pattern, but are some tricks and tips I have learned over the years from sewing this pattern. 

Today we will finish sewing our shirts. So let's get started! 


1. Press your sleeve hem up on both sleeves, short and long sleeve versions. I will be using only a long sleeve for the tutorial but both versions sew the same way. Pressing it now will help to hem it after the sleeve is all sewn.

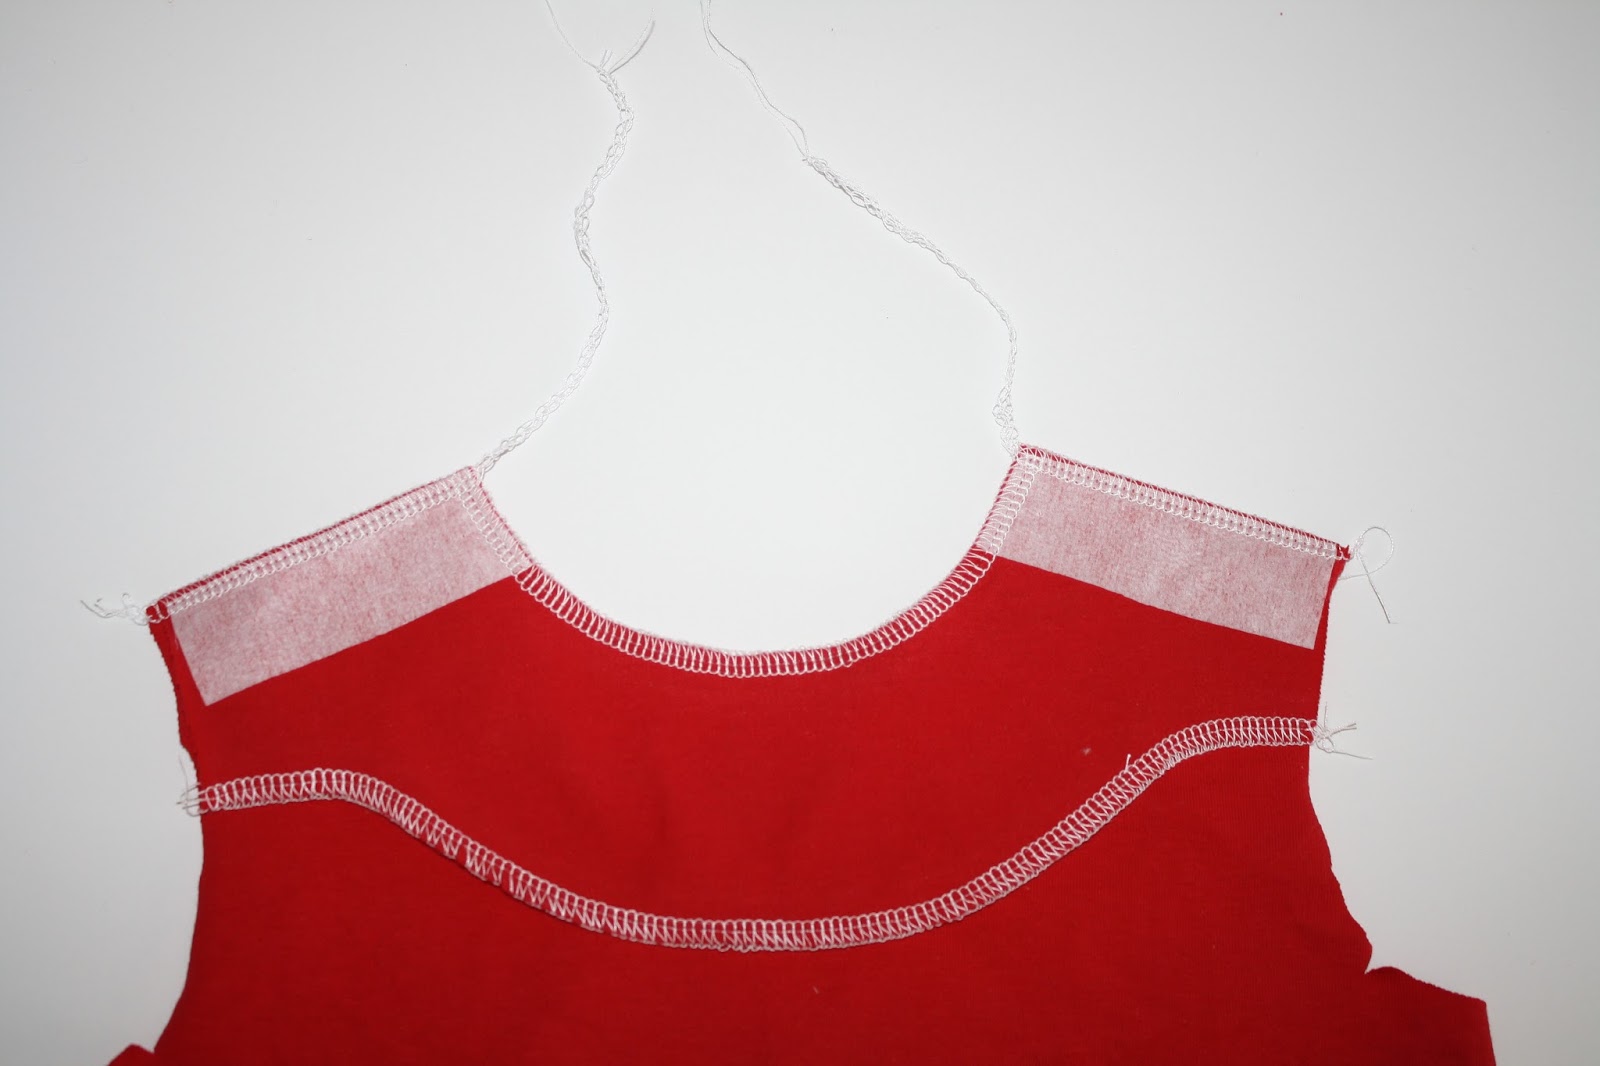
2. If you are sewing the top in a woven, be sure to sew in the gathering stitches to help ease the sleeve. For this tutorial I used knit, so this step can be skipped as the knit will stretch into place nicely. Take your sleeve and place it the corresponding shoulder, matching up the notches, with right sides together.  Pin the sleeve in place, then stitch. If using a serger to sew your sleeve in, remember to sew it with the ½" seam and trim the seam as you go. Repeat with second sleeve. Press seam away from the shirt towards the sleeve.

3. Fold your shirt in half with the right sides together and place the sleeve and shirt right sides together, matching up the bottom sleeve seam. Take your under arm seam and place each seam in the opposite direction to help the seams to "lock" in place when sewn and to also help reduce the bulk when worn as well.

4. Pin the the sleeve and sides together and stitch. Press your seam towards the back side of the shirt. Repeat with opposite side.

5. Take your bottom facing pieces and place them right sides together and sew up the two short sides. Press the seam towards the back side.

6. Take your facing and turn it wrong side out, then slip in over the bottom of the shirt  with the shirt facing right side out. Match up the two side seams on the facing and the shirt, pin in place. Pin the rest of the facing in place all the way around then stitch in place along the bottom edge.

7. Turn your facing to the inside of the shirt, rolling your seam towards the inside so the seam line is not visible from the outside of the shirt. Press well then pin the facing in place. Stitch the facing in place in the same manner as your top facing.

8. Take your shirt, while still inside out, and refold the sleeve hem and give it another good press. Turn your sleeve right side out.

9. With your sleeve right side out stitch the hem in place. I use a regular ball point needle on mine but you can use a twin needle here as well. Repeat with second sleeve.

10. Cut your buttonholes open and sew your buttons on in the marked places that you transferred from the pattern piece.

Now we can admire our newly sewn shirts!!


Tomorrow we will begin the pants and shorts part of our lessons. We will take it over the course of three days. I will be going over how to sew the shorts modification and how to line them as well. I can't wait to see you back here tomorrow!


Happy sewing,
Sharon 

*If you would like to earn entries into the prize drawing, please make sure to submit a photo of your completed Lesson Three to this Facebook Album by 12:00 noon CT, Friday, September 2nd. If you have any questions the Facebook Group is a great place to ask. 


Tuesday, August 30, 2016

Sew-Along #33 - Sailboat Outfit - Lesson #2

The Sailboat Outfit by Oliver+S

** If you would like to see an image on our blog in a larger format, just click on it to enlarge.

Note: Links to products within this post are either links to our website or affiliate links.

You can find the Oliver + S Sailboat pattern in the shop. Kits are available as well. Click on the links below:

Welcome to Day 2


Before we begin with today's lesson be sure to read all of the patterns instructions. Today, and throughout the entire sew along, you will need your pattern in hand to go along with each lesson. Some things I will share/teach will not be in the pattern, but are some tricks and tips I have learned over the years from sewing this pattern. 

1. First, start by cutting a piece of interfacing into a " strip. I like to make mine wider when using a knit fabric for the top. Also, I like to cut the interfacing the length of the shoulder as well. Fuse the pieces onto the wrong side of both the back and front facing pieces with a hot iron.


2. Finish the bottom edges of all your top facing pieces and the top edge of your bottom facing pieces. I use my serger for these steps. If you are using your sewing machine, use a narrow zig-zag stitch to finish your edges. Be careful not to trim any of the fabric away from your pieces.

3. Take your front and back shirt bodice pieces and transfer your markings for buttonholes and buttons onto the right sides.

4. Take your front bodice and front facing pieces and place them together with the right sides facing. Pin at them shoulders and neck line only.

5. If using a sewing machine go ahead and sew the the shoulders and neck line in one step. If using a serger follow the next few steps to make nice pointed corners for turning.

a.) Serge the neckline only with a ½" seam. You will be trimming the seam as you sew.

b.) Next, sew the shoulders on both sides with leaving a length of serger thread tail. (Once again you will be trimming your seam as you sew.)

c.) Take a tapestry needle and thread the serger thread tail back through the top of your serger line, repeat with the second side.

6. Turn your facing to the wrong side of the bodice and turn your corners out well; press. If you are using a sewing machine be sure to trim and clip your seams before your turn. Pin the facing into place.

7. Follow the bottom of the facing and sew it into place all the way across the facing's bottom.

This is what the front view will look like. This is also fun to use a contrasting thread or even trim here. Repeat with steps 4-7 the back bodice and facing.

8. Now take your front bodice and stitch your buttonholes.If you have never sewn a buttonhole on knit I recommend that you practice first. If your machine has trouble with eating the knit you can place a piece of wax paper between your sewing machine and fabric to help stabilize while stitching. When done simply tear away the wax paper.

9. Now take your back bodice and place it with the right side facing up.  Then place your front bodice right side facing up, overlapping the back bodice at the shoulders with the front bodice on top. Match up the back bodice notch to the front bodice shoulder edge. Pin in place.

10. Baste the two pieces together with a 1/3" seam allowance. Repeat with the opposite shoulders.

We will leave off here for today.

Let us know if you have any questions for today's lesson either here or the Facebook group. Also, be sure to add a photo of today's lessons in our Facebook sew along album. I will see you lovely ladies back here tomorrow as we finish our tops!

Happy sewing,
Sharon 

*If you would like to earn entries into the prize drawing, please make sure to submit a photo of your completed Lesson Two to this Facebook Album by 12:00 noon CT, Thursday, September 1st. If you have any questions the Facebook Group is a great place to ask. 


Monday, August 29, 2016

Sew-Along #33 - Sailboat Outfit - Lesson #1

The Sailboat Outfit by Oliver+S

** If you would like to see an image on our blog in a larger format, just click on it to enlarge.

Note: Links to products within this post are either links to our website or affiliate links.

You can find the Oliver + S Sailboat pattern in the shop. Kits are available as well. Click on the links below:

Welcome to Day 1

Before we begin with today's lesson be sure to read all of the patterns instructions. Today, and throughout the entire sew along, you will need your pattern in hand to go along with each lesson. Some things I will share/teach will not be in the pattern, but are some tricks and tips I have learned over the years from sewing this pattern. 
Today we will be modifying our pattern pieces (if need be) and cutting out our garments. 

1. First the pants/shorts. If you are sewing them as is from the pattern, have your pattern pieces cut out or traced off from the pattern in the size you need. If you are making the shorts modification we will need to adjust the pattern pieces on both the front and back pieces. For boys you will want the shorts longer, like board shorts style. (Well this style is cute on girls too!) For girls you will probably want them a shorter length. To get the length have your little one try on a pair of pants/shorts and measure the inseam for how far down you will want shorts fit. Take this measurement and add the 1/2" top seam allowance to it then add another 1 1/4" to the bottom for the hem. ( Example" child's inseam measurement 5"  + 1/2" top seam = 5  1/2". Add the hem to = 6  3/4" total). This total number will be your shorts leg length.  Now let me show you how to make this into the short pattern piece. 

2. I like to trace out any pieces I modify from an original pattern piece. This way I can mark all over it and retrace if I need too. For the boy shorts I draw a straight line at the top of the side pant vent using my quilting ruler, making sure to trace the line even from the very bottom hem of the pants.  Repeat with the back side of the pants pattern piece.

Now for a shorter length than the board shorts you will need to take your measurement from before and measure down from the crotch seam and mark. Use your quilting ruler to make the short bottom cut line even by using the original hem line as a guide. Repeat with the back pants piece. Now you have your short pattern pieces ready for cutting!
   
3. Cutting out the shorts/pant/skirt fabric.
 For the shorts cut out the following pieces of your fabric:
          2 front pieces
          2 back pieces
          1 front facing/1 interfacing piece
          4 front panels/2 interfacing pieces
If lining your short also cut out of the lining fabric
          2 front pieces
          2 back pieces


For the pants cut out the following pieces of your fabric:
          2 front pieces
          2 back pieces
          1 front facing on fold/1 interfacing piece on fold
          4 front panels/2 interfacing pieces
If lining your pants also cut out of the lining fabric
          2 front pieces
          2 back pieces


For the skirt cut out the following pieces of your fabric:
          1 front piece on fold
          1 back piece on fold
          1 front facing on fold/1 interfacing piece on fold
          4 front panels/2 interfacing pieces
If lining your skisrt also cut out of the lining fabric
          1 front piece on fold
          1 back piece on fold

4. Onto our shirts! For the sew along we are using a knit, (knit is what comes in your kit if you purchased one from us) but you can use a woven as well. If you are using a woven I recommend that you size one up from what your child measures on the pattern for ease of dressing. The pattern top seam allowance is a ½" so it is OK to cut out those notches. One side note about the top pattern, some do find the top length to run short, so please measure the top against your child to see if this will be a problem. I add 1½" to my children's tops so they get plenty of wear out them. 

5. Short sleeve modification:
Measure your child's arm with a shirt that you like the sleeve length. Add a ½" seam allowance to the top of the sleeve measurement. Now add an additional 1¼" seam allowance to this number. This will give your sleeve length. 

 
6. Take your sleeve pattern piece in hand and mark from the top of the sleeve down the measurement you just calculated. To make sure the sleeve hem is even across, place your quilt ruler at the bottom of your mark and use the ruler to even up the line at both shoulder lines. Draw a line straight across.


Make sure that your sleeve hem is long enough to sew the sleeve onto the shirt by taking the hem measurement and the new short sleeve line and subtracting the bottom hem and the seam allowance at the shoulder.


7. Cut only the bottom portion of the sleeve pattern piece off.


8. To be able to make a lovely hem we need to straighten out the side of the sleeve piece. This will allow us to make a nice even hem with no puckers while we sew it in place.

9. We are now ready to cut out our shirts. You will need the following pieces cut for both short and long sleeve versions:
          1 front cut on fold
          1 back cut on fold
          2 sleeves (either short or long sleeve)
          1 front facing cut on fold
          1 back facing cut on fold
          2 bottom facings cut on fold


We will leave off here for today. Tomorrow we will begin sewing our tops together. I will be using a serger for mine but you can use a sewing machine as well. Both work very well for this pattern.

Let us know if you have any questions for today's lesson. Also, be sure to add a photo of today's lessons in our Facebook sew along album. I will see you lovely ladies back here tomorrow as we start sewing our tops!

Happy cutting,
Sharon 

*If you would like to earn entries into the prize drawing, please make sure to submit a photo of your completed Lesson One to this Facebook Album by 12:00 noon CT, Wednesday, August 31st. If you have any questions the Facebook Group is a great place to ask. 


Saturday, August 27, 2016

Autumn Selections and our Semiannual BIG Sale is Happening Now! Hurry!!


Our mornings are already becoming crisp and our evenings cool here in Iowa. Autumn is on it's way!
http://www.whimsicaldesignsclothing.com/index.php?main_page=index&cPath=626


We have some great news though! Maddisen has agreed to continue her special fabric selections for the website throughout autumn. Woo hoo! The new category is called Maddisen's Autumn Selections and her first selection was posted yesterday. Grab it for 20% off through Thursday, September 1st. Isn't it gorgeous? And we even have matching machine applique designs for this fabric (also 20% off)!
http://www.whimsicaldesignsclothing.com/index.php?main_page=index&cPath=626


 In addition, if you are a part of our Whimsical Fabric & Me Facebook group, you might have seen that we posted our semiannual BIG Sale. We have over 85 fabrics priced at $7 or less. Choose from Riley Blake, Art Gallery Fabrics, Robert Kaufman, and even Fabric Finders. Check it out HERE. But hurry, the album will only remain up and the fabrics deals will only be available until 12:00 midnight CT tonight. Grab the amazing savings while you can!!
https://www.facebook.com/groups/WhimsicalFabricAndMe/permalink/2108841182675259/


Happy Creating!
Danielle Storm
www.whimsicalfabric.com